A simple console for a virtual pipe organ
by
Colin Pykett
Posted:
28 September 2013
Last
revised: 7 May 2019
Copyright
© C E Pykett 2013-2019
This
article has been written to satisfy requests for information about the
transportable console built for the Prog Organ
virtual pipe organ. It describes a simple, lightweight, low cost keydesk which can be dismantled readily and stored as a collection of
flat panels when not in use.
DIY electronic organ construction was popular a generation ago but it
has since declined into insignificance. Until fairly
recently, that is. Over the last decade there has been a modest resurgence
of interest driven by the appearance of the virtual pipe organ (VPO), an
instrument which uses a personal computer to generate the sounds. But one of the problems is deciding what to do about the
console or keydesk, assuming you want to play the VPO yourself rather than just
fire MIDI files into it. Although there are several options, two major difficulties apply to
most of them - size and cost. Any console built to standard
pipe organ dimensions using conventional constructional methods is going to be a substantial piece of furniture in terms
of the size, weight and appearance of the thing. Many cannot be dismantled
because the parts are rigidly glued together, so often they will not go through
doors and getting them up or down flights of stairs can be next to impossible.
Also the other occupants of the household might object to a conventional organ console in their living
space, and even an organ nut like me does not like an array of stops, keyboards and a pedalboard in my face all the time.
As to cost, buying a ready-made console can set you back thousands of pounds if you order one built to pipe organ standards from a trade
supplier. And that is just for an empty shell, unpopulated with keyboards,
stops, etc. Even some of the stripped-down designs intended for VPOs can still
cost more than a complete low-end commercial digital organ of the sort offered by a number
of firms. Costs are of course much lower if you buy a console second
hand, but the size and weight problems remain.
Sometimes against my better judgement, I have accommodated a large, heavy, conventional three manual
draw stop console in various homes over the last
few decades - see the picture below.
This
is definitely not a SIMPLE console!
So when I started to develop
my Prog Organ VPO system a few years ago the problem came to a head. There just
was not enough room for
another
'proper' console, but I did not want to get rid of the old one. Consequently I designed a
much simpler
collapsible console which can be assembled or taken apart within an hour. This can occupy space which is
temporarily unused, yet when dismantled it can be stored
simply as a collection of flat panels. However, without going well beyond the boundaries of a white
lie it cannot be called handsome and in fact it is solely functional in purpose.
Nonetheless, this should not discourage anyone wanting to improve its appearance as it would be straightforward
for one with the necessary skills. For example, the panels could be cut
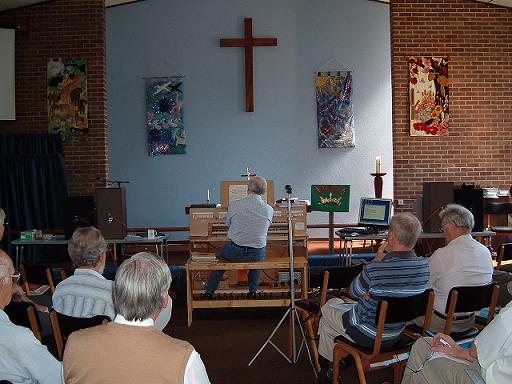
from veneered rather than plain MDF. But because it is lightweight as well as collapsible, it can be transported
readily to other venues for
demonstrations etc. These attributes mean that the entire Prog Organ system - console, bench,
pedalboard, speakers, etc - will fit into a small
van or towed trailer. It is pictured below being demonstrated in a church
only a couple of hours after it arrived in pieces.
But
this one is!
This
article describes how to make such a console. It also includes the
standard (so-called!) dimensions used in the UK by pipe organ builders as these seem not to
be widely available elsewhere in the literature. But note that the article
does not cover the additional furniture required in a console such as keyboards,
pedalboards and swell pedals except insofar as these dictate particular
measurements. However these matters are discussed in another article
elsewhere on the site [2].
General Arrangement

The
Prog Organ collapsible console in my studio
Another
view of the same console reposing in a corner of my studio is shown above, and in fact it doesn't look too bad despite the
previous remarks. Figure 1 should convey the essentials of its construction.
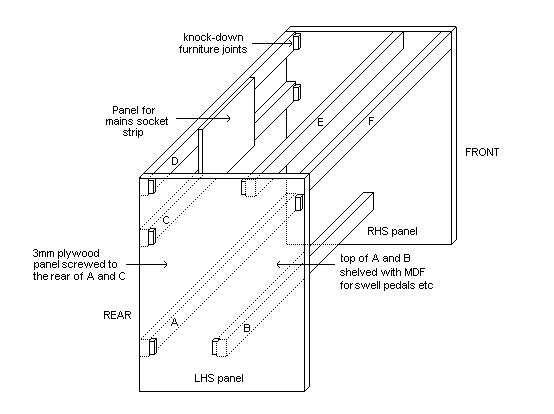
Figure
1. General arrangement of the console shell
Basically it consists of a skeleton shell
comprising two rectangular sides cut from 12 mm thick MDF, held together by 6 horizontal struts or battens of 45 mm
by 15 mm planed pine or deal. The struts are joined to the side panels by those commercial furniture joints which are variously called knock-down joints, screw-lock joints or snap-lock joints. Whatever their name, they consist of two plastic
or nylon components which are united by a steel machine screw and captive nut. This means you can separate and remake them
as often as you like without worrying whether the screws will eventually lose their bite, which would happen with wood screws of course.
You can buy these joints cheaply in packs of a dozen or more from
high street chains such as Wickes or B&Q. An example is shown in
Figure 2.

Figure
2. Knock-down furniture joints
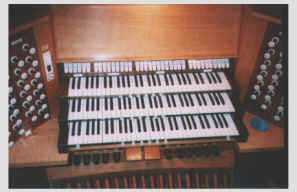
The keyboards are mounted on top of struts D, E and F and the stop panel sits on top of them, attached to their side cheeks in some convenient manner. The front of the pedalboard slides under strut B. The top surfaces of
the lower struts A and B are boarded over using MDF to form a
removable shelf, and the swell pedal(s) sit centrally on this.
In my console this shelf also holds electronic modules such as the power amplifiers,
the combination action power supply, etc. The VPO computer might also sit
here.
On its own this structure is too flimsy because it rocks from side to side. To prevent this, the whole thing is stiffened up with a large panel of 3 or 4 mm
plywood or MDF screwed to the rear surfaces of struts A and C (or an even larger
one attached to A, C and D) with a good number of wood screws. It is remarkable how rigid it then becomes, a good example of the whole being more than the sum of its parts.
You could also fit a front kneeboard if you wish. Besides
improving the cosmetic aspects, another advantage of doing so is that the rigidity would be further
increased, though it is not necessary from a structural point of view.
A small MDF panel is attached to the front faces of struts C and D - this is actually recessed well beneath the keyboards once everything has been assembled. As well as providing extra rigidity, I use this panel to hold a mains socket strip for supplying the various electrical units used in the console, an extremely convenient feature. I also attached a strip-light fitting to the front face of strut E to act as a pedal light.
A point worth bearing in mind is that the bottom edges of the two side panels will start to disintegrate if not protected in some way, because MDF is little more than thick cardboard. Therefore I screwed horizontal pieces of U-shaped aluminium channel with an internal dimension of 12 mm along the bottom of the panels. These act as a pair of extended feet for the console. However the total surface area at these points is still fairly small to take the weight of the whole console, and the pressure exerted on carpets or flooring could cause damage. Therefore I stand the aluminium runners on thin wood
strips to spread the load once the console has been assembled. These could be attached permanently if desired.
Dimensions
It is not possible to give more than the most basic guidance on absolute
dimensions because it is a curious fact that minimum console size is dictated mainly by the
measurements of just two components - the pedalboard and the swell pedal(s).
This might seem strange to those who have not made a console before, but it is because the pedalboard determines the
width and height, and virtually all pedalboards are different. The swell
pedals likewise determine the depth (front to back). Therefore you must
have your pedalboard and the swell pedals available, as well as the keyboards, before you start to cut
wood.
A point I want to make here is that the datum height from which everything else is measured is
the top surface of the middle D pedal key. I cannot emphasise too strongly how important it is to get the measurements correct relative to this datum,
otherwise your console will be perennially uncomfortable to play and
it will tire you rapidly. It is equally essential to ensure that the following measurements are also correct:
1. The amount by which the pedals are recessed under the manual keys. This varies depending on whether you have two or more manuals as discussed later, and it can be adjusted to taste to a limited extent.
2. The horizontal alignment of the pedal keys and the manuals. Middle D of the manuals should be vertically above
middle D on the pedals. This will usually mean that the manual keyboards are slightly
off-centre relative to the pedals, at least for 30 note pedalboards.
As mentioned already it is the pedalboard which sets the minimum console width, which will typically be around 1320 mm / 52
inches. This assumes you will be using stop keys mounted above the
keyboards, but if draw stops or touch screens are to be used they might require additional width
to be allocated on each side of the keyboards. The minimum depth of the console from front to back is dominated by the swell pedal measurements as well as by the
recessed position of the pedalboard itself. You cannot have the swell pedals too far forward otherwise they interfere with your feet when playing the pedal keys. (I once played an
organ in which the swell pedal actually depressed a pedal key if you closed it fully! How stupid was that?). However depth is a good thing, because if the console is not deep enough the weight of the overhanging keyboards can cause it to topple forwards too easily.
So all the measurements in Figure 1 depend on the pedalboard and swell pedals rather than being absolute, which is why I could not include any in
the diagram.
However, as a rough guide for a two manual console, the side panels in the one
illustrated above measured 435 mm deep by 790 mm high. Although the term "standard RCO measurements" is often bandied about, I do not think it can have any real meaning when people
themselves vary so much. If these measurements still exist and have a formal
status, they are more often ignored than observed on the basis of the wide variations seen in recent
organs (see note [1]). I have included the most important measurements used today by a respected organ builder at Figure
3, and you can see the amount of leeway which he allows himself. Although
you can also access the AGO measurements from their website in the USA, the last
time I looked there seemed to be errors in the data so it would be worth
checking them independently if you want to use these.
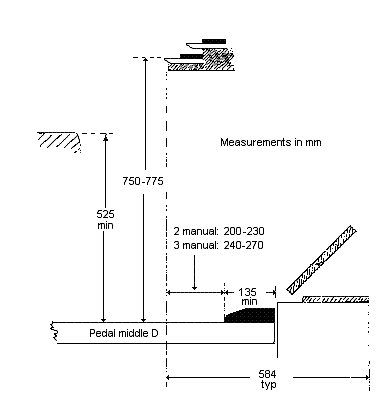
Figure
3. 'Standard' UK console measurements
Apart from the height of the bench, another critical measurement where you might want to introduce variations is that which determines the amount by which the pedals are recessed under the manual keys. This strongly influences playing comfort. In the diagram it is shown as 200 - 230 mm for a 2 manual organ and 240 - 270 mm for 3 manuals or more.
You should certainly use the larger figures if you have more than 2 manuals, or you will have difficulties pedalling without tipping forward when playing on the top keyboard. These
are important ergonomic aspects which, apart from being merely uncomfortable, can cause
chronic back problems if you do not get them right.
Another view of the assembled console, fully populated with keyboards etc, is
shown in Figure 4.
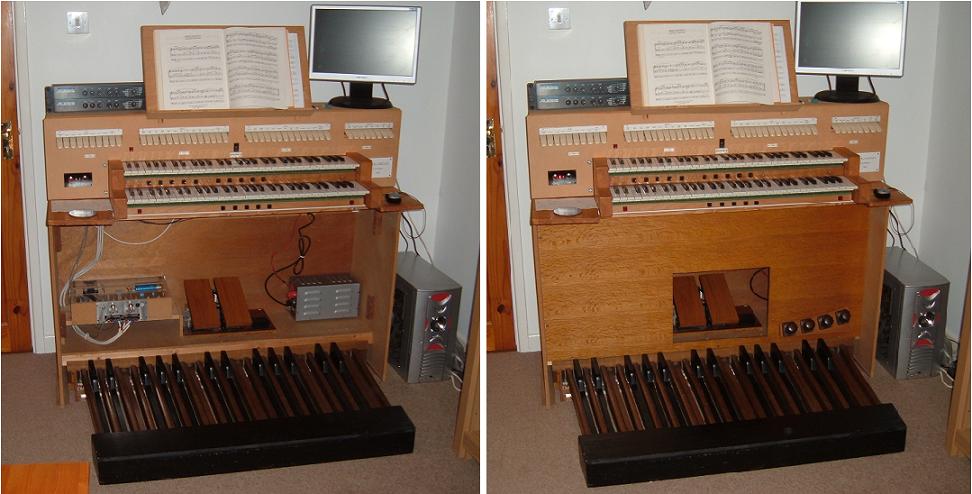
Figure 4. The assembled and fully populated console
As
mentioned previously, its cosmetic aspects are plainly much improved by
the addition of a kneeboard made from 9 mm plywood screwed to fillets attached
to the sides of the console. Note the use of oak-faced ply to improve the
appearance. The keyboards are mounted on a 19mm panel which sits on top of the
console shell, and rectangular deal end pieces fill in the gaps at each
side. These three panels are all attached to struts D and F (see Figure 1)
using knock-down joints. The keyboards and end pieces all overhang the
console by the amount specified in Figure 3 relative to the pedalboard. There is not much inside the console -
the power amplifiers are in the box to the left of the swell pedal assembly, and
the combination action power supply is on the right.
Just to the right of the swell pedals is a small black foot switch which can barely be discerned - this is used (for example) as a Hope-Jones type
'sforzando'
pedal or as a sustain pedal for a simulated piano when a
virtual theatre organ is in use. The VPO computer is on the floor outside
and to the right of the console. The stop panel sits on top of the
keyboards, and it is attached to the keycheeks rather than to the console
itself.
The Bench
Instructions for making benches are rarely found,
and my efforts over the years have convinced me that it is impractical to make a knock-down
bench, unlike the console itself. This is because the bench must be so rigid that it has to be screwed and glued up as an indivisible entity.
My home-made bench can be seen in the photograph above
and its construction was fairly straightforward. I made it from planed pine boards about 19 mm thick which can be bought in various sizes. These are
generally fabricated from adjacent narrow strips in which the grain runs in opposite directions, and this makes them warp-resistant. Yet because they are of natural wood, they can take a variety of attractive finishes.
In the same picture you can see a substantial stretcher bar just above the pedals. However what you cannot see is an identical one placed centrally under the seat to take the weight of the player. Both
bars were of planed deal or pine about 30 mm by 65 mm in cross section. The stretchers were attached to the side panels using
flanges cut from the same boards used to construct the sides and the seat, as illustrated in Figure
5.
Figure
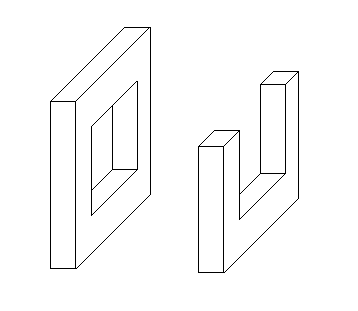
5. Wood flanges used for the bench stretchers (two required of each)
The closed flange on the left of this diagram is used at each end of the lower stretcher, and the open U-shaped one shown on the right
is for the upper stretcher underneath the seat. The apertures should be made carefully to give a snug fit on the stretchers, otherwise the glue will not form a strong bond. The flanges are first pinned and glued to their mating surfaces on the side panels of the bench and the stretchers are then glued into them.
While the glue is still wet, the whole lot is pulled together with substantial wood screws (e.g. 2 1/2 inch by no.
12 - forgive the Imperial units) inserted from the outside of the panels into the stretchers. If you are fussy about finish, you can use brass screws with screw cups.
Many professionally-made benches use a similar technique, as the posher cabinet maker's wedged mortise and tenon joints tend to work loose over time even though they look nicer. Screws enable you to re-glue and then tighten things up more easily if these problems arise.
PVA (white) glue should be applied to all mating surfaces besides the flanges and stretchers. The finished item can be given a couple of coats of polyurethane varnish - I prefer a matt or silk finish as, paradoxically, it seems to present less friction to a player's backside when sliding along it than a gloss finish does.
Once it has set, I always rub polyurethane down slightly with
very fine wire wool and then apply beeswax, as I find
it dries to a hard and unpleasant pimply surface otherwise.
As with the console, I used U-shaped channelling on the bottom surfaces of the side panels to prevent them becoming chipped and to spread the load better on the carpet or flooring. I found some tough plastic channelling intended for edging shelves which did the job.
A
shot of the underside of the bench is at Figure 6 which might help to better
understand how it is constructed.
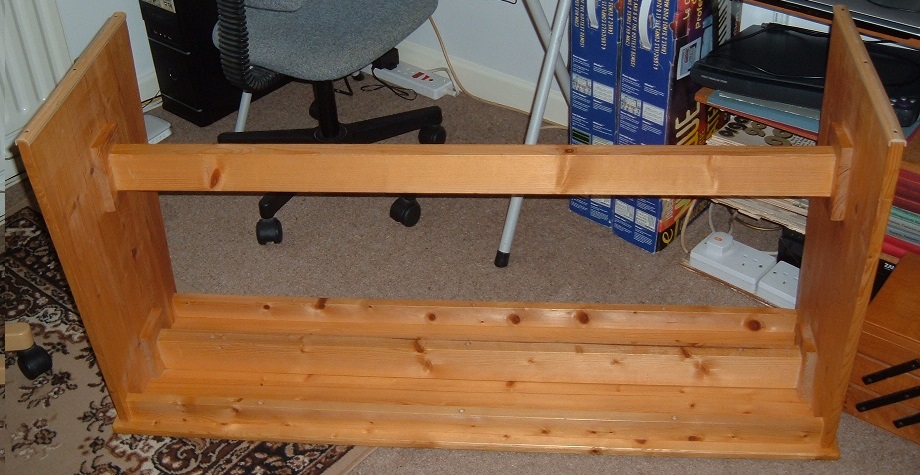
Figure
6. Underside of the bench showing the stretchers and their flanges, and
the plastic channelling screwed to the side panels
So
that's it - a collapsible console which is not only lightweight but
which can be made very cheaply. It can also be stored unobtrusively when
required. Yet it is of standard dimensions, and apparently mine
has not (so far) intruded into the consciousness of the many players who
have sat at
it. Either they have been very polite or they did not notice its
simplicity. If the latter, I take it as a compliment.
Notes
1.
I do not think there ever was such a thing as the 'RCO standard console'.
There has never been any mention of it on their website whenever I have looked,
and it is more likely that the term arose in the mid-twentieth century when the
now-defunct firm of Hill,
Norman and Beard built an organ in their former premises in Kensington
Gore. It seems the dimensions of the detached console of this instrument
might have set some sort of de facto standard which attracted a more formal status with time.
2.
"Console-building hints and
tips", an article on this website, C E Pykett 2019.